Friday, February 26, 2010

International Space Station radio link-up

I just had a lovely evening at my kids' primary school.  A group of staff, parents and amateur radio enthusiasts have worked for months to organise a very special event: A radio link-up with the international space station.

To talk to the ISS, some local amateur radio enthusiasts hooked a phone line up to the PA, and this phone line went to Shane Lynd of Glendon, Queensland.  Using his aerial, radio equipment and phone patch, we were able to talk with astronaut Timothy "T. J." Creamer while the ISS was within line-of-sight of Glendon, which was about six or seven minutes.

The link-up was arranged by Tony Hutchison of Kingston SE, South Australia, who coordinates ARISS (Amateur Radio on the International Space Station).  ARISS lets crew members talk with family and schools, and provides backup comms with the station.  There's a nice video about Tony's work here

  http://www.youtube.com/watch?v=2KL8TGTUBTU

The students took turns to say their name, ask their question, and finish with "over".   Here's the list of questions, plus my unreliable recollection of the answer T. J. gave [and some comments by me]:

  1. At what stage in your life did you decide you wanted to be an astronaut?

    He said it wasn't a sudden choice, a lot of things he'd done beforehand prepared him for it and when he had the chance, he said yes.  [His bio is here]

  2. Does living in a zero gravity environment cause long term health problems?

    There are changes to bone density, to the muscles of the heart, and even to the structure of the eye.

  3. How far have astronauts ever been in space?

    To the moon.  Most people don't realise that only 12 people have been to the moon.  Everything else has been done in low Earth orbit.

  4. Who was the youngest astronaut to go into space? How old was she or he?

    T. J. didn't know the answer to this one, but he suggested that the student go to nasa.gov or Google for it.

  5. How do you exercise in space?

    He said he uses a treadmill, with bungees that keep him in place so he doesn't float away.

  6. How did you get into space?

    He said he was launched on a Soyuz rocket from Baikonur Khazakstan.

  7. What if there is a fire? Can you get rescued?

    He said that the space station is designed so that in general, things can't catch fire.  But if there was a fire, they'd cut the power and the fire would likely go out.  They can also use fire extinguishers.  If the fire was too serious, they could come home in the Soyuz capsule that is always docked to the station.

  8. What’s the most interesting thing about space?

    He said floating around, and looking at the Earth.

  9. How do you drink in space because there is no gravity in space?

    He told us about how they drink from fluid pouches.

  10. How do you control the space ship when it is floating in space?

    He said that attitude control is done with gyrodynes [but I think he means control moment gyroscopes, as gyrodynes are a type of aircraft].  If the gyrodynes become saturated, small thruster rockets take over to correct the situation.

  11. Are there aliens in space?

    He said he hadn't seen any, but he'd sure be glad to meet and talk with them.

  12. How do you sleep in the space station?

    He said he zips himself into his sleeping bag, that has straps which stop him floating around.  He said he sleeps very well.

  13. What is your favourite food you eat in the space station?

    Fresh fruit.  He said it was great when the Space Shuttle brought up some fresh fruit.

  14. What do you do on the space station to relax?

    He mentioned that he likes to go into his bedroom and read or use the internet to research things.  [He also likes running]

  15. What happens if you run out of air?

    He said that this is managed pretty closely from the ground, so it's unlikely to happen.

  16. What happens to all the rubbish from the space station?

    All the trash gets put into the Progress resupply vehicle, which is undocked and deorbited.  The vehicle and the trash burns up in the Earth's atmosphere.

  17. How often do you have to do space walks to make repairs to the space station?

    He said that they don't generally go outside to fix things.  He said that he's done spacewalks, but he's not scheduled to do any spacewalks on this expedition.

  18. When you are in space are you ever nervous about anything?

    He said that in general, he's not.

  19. When you swallow your food, does it feel funny in your stomach when in zero gravity?

    [out of range]

Unfortunately the 19th question couldn't be asked, as the station had moved out of range.  I feel sorry for that student.  If I was that student, that would be one of my "life's regrets".  (And I have so few)

In all, well over 200 people enjoyed the evening.  A big thank you to T.J., Tony, Shane, the local amateur radio enthusiasts, and all the others who made this possible.  It was certainly a night I'll never forget!

Wednesday, February 24, 2010

Computer assisted Chinese (part VII): Touchscreen 5

Last entry, I had the larger touchscreen working with X, and I worked out how to map the touchscreen data to a rectangular area on-screen.  This time, I will try to get a Nintendo DS touchscreen working with X.

Although my ultimate goal is to make a true USB device, for the moment I'm going to use an Arduino as the microcontroller. 

  http://www.arduino.cc/

The Arduino has an FTDI FT232RL chip on it.  This speaks USB on one side, and TTL-level RS-232 on the other.  On the Arduino board, the FTDI's serial port connects to pins 0 and 1 of the Arduino, which is the microcontroller's UART port.  This lets you send information to and from the microcontroller over USB, and what the PC sees is a USB serial port.

My plan is to make a serial port based touchscreen which emulates one of the existing serial port touchscreens supported by Linux.  Hopefully this means I don't have to write any kernel code.

I looked around in the kernel's drivers/input/touchscreen directory for the serial port touchscreen driver with the simplest protocol.  The most likely candidate seemed to be the driver for the 3M MicroTouch.  It's a five byte protocol, and the driver looks pretty simple.  I'll come back to the protocol later.  For the moment, I want to see if I can read the touchscreen ok.

A touchscreen is a sandwich of two transparent plastic plates.  Each plate is covered with a conductive film, and one plate is printed with tiny plastic bumps to keep the two plates apart when not being touched.  You can find out more about how touchscreens work here.

My touchscreen has four wires.  These wires must be connected to the Arduino board, so I made my own "breakout" board.  I used one of the Sparkfun connectors I bought to fix my Nintendo DS touchscreen.

Soldering the touchscreen connector was "fun".  Remember, there's four conductors in the space of 1.5mm.  I had a lot of problems with solder bridges between the pins.  I eventually solved this problem by using a jig made of polyimide tape with three fingers, which fit between the pins and make a physical barrier to prevent solder getting from one pin to the next.  After completing the soldering, I removed the fingers.

Polyimide tape is a heat-resistant film that is sold by DuPont under the name of Kapton.  Cheap polyimide film can be bought here.

The wire I'm using is wire-wrap wire.  Four of these wires next to each other give exactly the right spacing.

In order to prevent the tiny wires on the connector from breaking, I wanted to put the connector on a board. I didn't want to glue the connector, as there's a risk that glue will get inside. So I made my board out of a small piece of unetched printed circuit board, and soldered the connector to the board. The 4-pin connector has solder pads on the bottom: how to solder it to the board?

Recently I bought myself a small tub of solder paste.  This is a mix of microscopic solder balls, suspended in a liquid to make a paste.  Although it looks a dull grey to the eye, I looked at it under the microscope at our hackerspace, and yes, it's a sea of unbelievably tiny balls.  How cool!

I used a pen to draw the dimensions of the connector onto the end of the PCB, then used a rotary cutting tool to remove the copper where the touchscreen conductors go.  There's still copper underneath the solder pads on the connector, but no copper under the touchscreen wires.

Using a jeweller's screwdriver, I applied a tiny amount of solder paste to the copper of the board where the connector's solder pads will go, and placed the connector.  Holding the connector in place with my finger, I touched the soldering iron to the copper next to the connector.  The copper conducted the heat into the solder paste, and I could see the paste turn from a dull grey to a lovely silver.  I could also see surface tension pull the solder into a nice shape around the solder pads.  Result: One nice strong strain relief for the connector and the wires.  This solder paste worked very well, and I will definitely use it more in the future.  I bought it very cheaply here.

Next, I used 4 header pins to join the wire-wrap wire to the four-conductor flexible ribbon cable, and used 4 right-angle header pins at the other end to make a plug for the Arduino.  To finish off. I used hot glue to lock the ribbon cable in place at both ends.  Here's the result:


The breakout board is a bit rough, but it's a prototype.

(If you have keen eyes, you may note a button attached to the lower Arduino connector.  More about that later)

Well, that's the mechanicals done, now for some software!

Tuesday, February 23, 2010

Replacing DS touchscreens (part I): When it all goes wrong

The other day I was talking about the cheapie touchscreens from DealExtreme:

  http://www.dealextreme.com/details.dx/sku.3245

I bought a few for experimenting with, and one for replacing the touchscreen in my sons' Nintendo DS, as that touchscreen has developed problems.

To find out how to replace the touchscreen, I watched these guides:


  http://www.youtube.com/watch?v=5a1AIWYXPmg


  http://www.youtube.com/watch?v=lir1HCupK9Q

They make it look so easy!

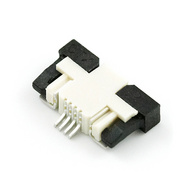
Anyway, I successfully opened up that Nintendo DS, and was able to split the old touchscreen from the LCD and replace it with a new one. The problem came when I tried attaching the new touchscreen to the connector on the PCB. That connector has a tiny black plastic lid, and unfortunately for me, one of the legs on the lid broke off.  You can see the connector here:


That connector is tiny as!  To give you an idea of scale, the touchscreen ribbon cable you can see in the lower left is 2.5mm across: Just 1/10th of a inch!

Without the lid, the connector doesn't push down on the touchscreen cable, and the touchscreen doesn't work.  What to do?  Without a working DS, my kids will kill me!

I thought of trying to hot-wire the touchscreen cable to the board, either directly or via four tiny wires, but I couldn't think of a way that wouldn't risk damage to the PCB, so I decided to buy a new connector.

The first place I looked was SparkFun.  I found this connector:


(Click on image to go to the product page)


Although the shape is different, they are only about US$1 each, so I bought a few.  Actually, I bought them from SparkFun's local distributor, Little Bird Electronics.

The connectors arrived in about a week, and when I got them, I noticed something rather unfortunate: The connectors on the Nintendo DS PCB are designed to have the contacts on the touchscreen facing down, whereas the SparkFun connectors are designed to have the contacts facing up.  I don't think that's going to work!

In order to confirm this, I spent more than two hours at our hackerspace, soldering wires onto those four pins under a microscope.  And yes, that connector is the wrong way around and not suitable.

So, I did some more web digging, and found a company called Golden Bridge in Hong Kong.  It seems they're not dissimilar to Deal Extreme, and they have what appear to be the proper DS connectors:


(Click on image to go to the product page)


I ordered a few connectors a week ago, and I'm waiting for them to arrive, which they should do any day now.  Unless they arrive tomorrow, I won't get them in time to solder at hackerspace.  Which is unfortunate, as if my kids don't get their DS back soon, I think I'm going to be buying them a new DS.  Either that or I think I'll have to leave home...

Wednesday, February 10, 2010

Computer assisted Chinese (part VI): Touchscreen 4

Last article, I had a working touchscreen where the whole of the touchscreen surface was mapped to the whole of the display.

Skritter is a flash-based web app.  In scritter, there's an area in the middle of the window in which you can use your input device to enter the strokes for the character:


So I have the requirement that I want to map the touchscreen area just into that rectangular area.

Here's another requirement: A 15cm x 9cm touchscreen is designed to fit over a display, not sit on one's desk.


It's too large to comfortably write on, as my wrist hits the surface when writing and throws off the cursor. So I only want to use a small area of it.

And since I eventually want to build this with a cheap nintendo touchscreen, not a full-sized one, I'd like to just use one corner of the large touchscreen.

Further, I want size and aspect ratio of my small corner of the large touchscreen to be roughly the same as for the nintendo touchscreen. Fair enough.

But it gets better: When I finally use the nintendo touchscreen, I want the aspect area of that touchscreen to be the same as Skritter's on-screen drawing area. Since the aspect ratio of the Skritter writing area is slightly different to the nintendo touchscreen area, I will only use about 85% of the nintendo touchscreen area.

So, somehow I have to map a small corner of the large touchscreen, onto this particular on-screen rectangle.

The 11-eGalax.fdi file mentioned in the last article has a line of calibration data:
<merge key="input.x11_options.Calibration" type="string">32 3990 48 3990</merge>
Those four values are the data values one should expect to get from the touchscreen when touching the minimum x, maximum x, minimum y and maximum y positions on the touchscreen. The reason we can provide the numbers is to allow for variations in the properties of each touchscreen, although in general, the values will be around the minimum and maximum values the touchscreen can produce. But what if I fake these values?  Can I use this to trick X into mapping one area onto another?  Let's try...

One thing to note is that from my testing: I've found that the X axis and the Y axis are reasonably independent of each other: Running the stylus along a horizontal or vertical ruler on the touchscreen shows one axis changing a lot but not the other.  Therefore I think the number crunching for the X and Y axes can be done independently.

Mapping an input range of numbers onto an output range of numbers isn't hard. We can visualise the map as a graph, where the X axis shows the input range, and the Y axis shows the output range. The limits of the input and output range correspond to two points on the graph. We can then find the linear equation which describes the line, and once we know that, find the output value for any input value. This should map the touchscreen area to the on-screen area, but also, if we reverse the mapping and feed in the dimensions of the screen, we should be able to find the four calibration values we need to give us the desired mapping.

The first thing I did was work out how much of the touchscreen I want to use. I first considered the case of the nintendo touchscreen.

The pixels on my LCD display are square, so the aspect ratio is 1:1. When the web page is fully maximised, the size of the Skritter writing area on my screen is 347 pixels by 402 pixels. That's an aspect ratio of 0.86. I want to keep the same ratio on my touchscreen.

If I place the nintendo touchscreen with the long axis vertically, the active area is 47.5mm across by 63.5mm high, which is an aspect ratio of 0.75.  Note the two aspect ratios aren't the same.  If I want to keep the aspect ratio the same, I'll have to give up using a small area of the touchscreen.

If I map the width of the touchscreen to the width of the Skritter writing area, the height of the part of the nintendo touchscreen I'll be using is 47.5mm / 0.86 = 55mm. (I can use the remainder for not-on-screen special functions).


Note this picture is not to the same scale as the previous picture.

I then got an index card and cut out a rectangle 47 x 55mm.  I can then place this on top of the larger touchscreen to show me the useable area of the smaller touchscreen:


For comparison, here's the nintendo touchscreen on top of the larger touchscreen:


(The colour difference is because I took the two pictures at different times of the day)

Then I ran the evtest program again,and recorded the touchscreen values for the top left and bottom right corners of the uncovered area on the card.  (The values are backwards because I'm using the touchscreen rotated by 180°).

Tscreen Point X data value Y data value
top left 1940 1850
bottom right 950 203

Skritter Point X data value Y data value
top left 504 285
bottom right 851 687

Screen Point X pixel Y pixel
top left 0 0
bottom right 1680 1050

Now, time for some number crunching.  Treating the X and Y axes separately, we can find the m and c in y=mx+c to map the touchscreen coordinates to screen coordinates.  Then, using x = (y-c)/m, we can feed in the boundaries of the screen, and found out the effective values if the touchscreen was big enough to cover the whole screen, and mapped our touchscreen area onto the Skritter writing area.

I cooked up a spreadsheet to do the number crunching.  I typed in all the coords, and it spits out the four "calibration values" I needed.  You can find the spreadsheet here:

  http://spreadsheets.google.com/ccc?key=0Av3tC4mEgkZPdEl5cl9IR09RdzktUmJvWjEwQURoelE

If I use the data from the tables above, I get the following four values:

Min X 3378
Max X -1415
Min Y 3018
Max Y -1284

Note that two of the four numbers are negative.  That's to be expected.  It just means that with the mapping we have, the lower right corner of the touchscreen is inside the display area.  That's ok for us, because we'll never be sending negative values anyway.  (I'm feeling pretty lucky that whoever wrote the HAL and X stuff didn't disallow negative calibration values....)

So, then I plugged these values into the 11-evdev.fdi file:
<?xml version="1.0" encoding="ISO-8859-1"?>
<!-- 10-synaptics.fdi is claiming all input.touchpad's as its
     own. This file is meant to be loaded afterwards and to undo
     any wrong assignments it did.
-->
<deviceinfo version="0.2">
  <device>
    <match key="info.capabilities" contains="input.touchpad">
      <match key="info.product" contains="eGalax">
        <merge key="input.x11_driver" type="string">evdev</merge>
        <merge key="input.x11_options.Calibration" type="string">3378 -1415 3018 -1284</merge>
      </match>
    </match>
  </device>
</deviceinfo>


Enough talking, what happened after I restarted HAL and X?  Well, it worked first time!  A light touch to the corners of the restricted touchscreen area goes straight to the corners of my on-screen input area.  I love it when something works first time!  To celebrate, I went and practised Chinese characters for three hours.  So much nicer with a pen rather than a mouse!

What's next?  Well, now that I have the larger touchscreen working, I want to get the cheapy nintendo touchscreen working.  Oh, and practice Chinese more :-)

Computer assisted Chinese (part V): Touchscreen 3

In the last article, I was getting good sample data from the touchscreen.  But does it work in X? Sadly, it doesn't. Or at least not straight away.

(Note, you'll need to make sure the xorg-x11-drv-evdev package is installed).

When a new USB device (such as that touchscreen) is plugged in, the kernel tells the HAL subsystem. HAL notices the new input device, and tells X about it, and X starts listening to the new device. The beauty of this system is that X can respond correctly as input devices are connected and disconnected from the machine.
The problem is that the standard Fedora kernel treats this kind of touchscreen as an evdev device (good), but HAL makes a mistake about what kind of device it is.  There's a rule in HAL which says "any touchscreen which I don't know about must be a "Synaptics" touchpad". This bad guess gets passed onto X, and X tries to interpret the device as a Synaptics touchpad. Since the device (by the time it gets to X) is really an evdev device, X doesn't know how to handle the touchscreen properly.

So in order to get the touchscreen to work, I had to work out how to convince HAL that the touchscreen was an evdev device, not something else.

This problem has also been experienced by others, and is covered in Fedora bug 473144. To cut a long story short, the most convenient solution is to create a file which tells HAL which kind of input device it really is. Comment 45 of that bug contains a suitable .fdi file:

  https://bugzilla.redhat.com/show_bug.cgi?id=473144#c45
<?xml version="1.0" encoding="ISO-8859-1"?>
<!-- 10-synaptics.fdi is claiming all input.touchpad's as its
     own. This file is meant to be loaded afterwards and to undo
     any wrong assignments it did.
-->
<deviceinfo version="0.2">
  <device>
    <match key="info.capabilities" contains="input.touchpad">
      <match key="info.product" contains="eGalax">
        <merge key="input.x11_driver" type="string">evdev</merge>
        <merge key="input.x11_options.Calibration" type="string">32 3990 48 3990</merge>
      </match>
    </match>
  </device>
</deviceinfo>
That bug mentions a file in /etc/hal/fdi/policy called 10-synaptics.fdi. I don't have a file of that name in that directory. Instead, on my machine, it's in /usr/share/hal/fdi/policy/20thirdparty. So I decided to copy the file from that bug report into a file called 11-evdev.fdi in that directory. Then I had to restart HAL in order for it to see the new .fdi file:
  service haldaemon restart
After doing that, I can now see the touchscreen in the output of lshal.

What happens when I restart X? Well, the touch screen works. Sort of.

Note that the maximum X and Y values in that file for the touchscreen axes are 3990. But the evtest utility reported maximum values of 2047. I found that if I use 3990, I can only use the touchscreen for the top left quarter of the screen. Obviously those numbers are wrong for my touchscreen.

When I changed the numbers to 32 2000 32 2000, the touchscreen could point at any location on the X display. Success!

So, what I have now is a working touchscreen, and a setup which maps the whole of the touchscreen to the whole of the display. For reasons I'll go into soon, that's not what I want. But, good progress so far.

Computer assisted Chinese (part IV): Touchscreen 2

I want to use Skritter with a pen, not a mouse. Commercial products are too expensive for me, so I want to make something using a touchscreen.

While I plan to eventually use a cheap Nintendo touchscreen, I want to start with a touchscreen that I already have, one that used to be in my EeePC. This way, I don't have to deal with as many variables at once.

The interface board for this touchscreen usually speaks to a proprietary kernel module, and proprietary X driver. I would rather not use proprietary software, as proprietary software doesn't let me change things if I need to.

Once upon a time, X was configured with a file called /etc/X11/xorg.conf. This file was a description of all the input and output devices that X had to speak to. You could tell X about a device such as a touchscreen, by having an InputDevice stanza in /etc/X11/xorg.conf, which would cause X to load a driver for that input device. The touchscreen maker provides a proprietary driver for this purpose.

Those days are now gone. In Fedora (and probably in other recent Linux distributions), there's no longer an /etc/X11/xorg.conf file. Instead, it's all done with auto-detection.

The Linux kernel has a subsystem called evdev. It unifies handling of keyboards and pointing devices (and can even "mix" different input devices into one virtual device). The kernel contains drivers for many input devices, which use the services of evdev. One of those drivers is for the touchscreen I have. And for each input device, there'll be a device file in /dev/input.

To start off, I did an ls of /dev/input for files matching event*:
mjd@blackcat [/] ls /dev/input/event*
/dev/input/event0  /dev/input/event2  /dev/input/event4
/dev/input/event1  /dev/input/event3  /dev/input/event5
After I plugged in the touchscreen, I saw this:
mjd@blackcat [/] ls /dev/input/event*
/dev/input/event0  /dev/input/event2  /dev/input/event4  /dev/input/event6
/dev/input/event1  /dev/input/event3  /dev/input/event5
So it appears that /dev/input/event6 is the device file for the touchscreen. I ran evtest on this device: (evtest is in the evtest package)
[root@blackcat /]# evtest /dev/input/event6
Input driver version is 1.0.0
Input device ID: bus 0x3 vendor 0xeef product 0x1 version 0x100
Input device name: "eGalax Inc. USB TouchController"
Supported events:
  Event type 0 (Sync)
  Event type 1 (Key)
    Event code 330 (Touch)
  Event type 3 (Absolute)
    Event code 0 (X)
      Value    249
      Min        0
      Max     2047
    Event code 1 (Y)
      Value   1397
      Min        0
      Max     2047
Testing ... (interrupt to exit)
Event: time 1265760809.718325, type 1 (Key), code 330 (Touch), value 1
Event: time 1265760809.718331, type 3 (Absolute), code 0 (X), value 246
Event: time 1265760809.718332, type 3 (Absolute), code 1 (Y), value 1390
Event: time 1265760809.718335, -------------- Report Sync ------------
Event: time 1265760809.770319, type 3 (Absolute), code 1 (Y), value 1389
Event: time 1265760809.770322, -------------- Report Sync ------------
Event: time 1265760809.810320, type 3 (Absolute), code 1 (Y), value 1388
Event: time 1265760809.810325, -------------- Report Sync ------------
Event: time 1265760809.822320, type 3 (Absolute), code 0 (X), value 303
Event: time 1265760809.822322, type 3 (Absolute), code 1 (Y), value 1331
Event: time 1265760809.822326, -------------- Report Sync ------------
Event: time 1265760809.834320, type 3 (Absolute), code 0 (X), value 331
Event: time 1265760809.834322, type 3 (Absolute), code 1 (Y), value 1303
Event: time 1265760809.834326, -------------- Report Sync ------------
Event: time 1265760809.846321, type 3 (Absolute), code 0 (X), value 403
Event: time 1265760809.846323, type 3 (Absolute), code 1 (Y), value 1235
Event: time 1265760809.846326, -------------- Report Sync ------------
Event: time 1265760809.878320, type 1 (Key), code 330 (Touch), value 0
Event: time 1265760809.878326, -------------- Report Sync ------------
^C
[root@blackcat mjd]# 
When I touch the touchscreen, I get data! And the data looks sensible, with values for each axis from 0-2047!  Now to get it working with X...

Tuesday, February 9, 2010

Computer assisted Chinese (part III): Dictionary

The second project stems from my deep unhappiness with the Chinese electronic dictionaries that are out there.  Most of them are aimed at Chinese people learning English, not westerners learning Chinese, and they really suck.  The only thing more awful than the software that's generally on them is the horrid dictionary databases in use.  If there are five ways of saying the same thing, how do we know which one is right for the situation?  And which are current and not archaic?

When I've read English dictionaries for Chinese people, the English seems about 100 years old and quite laughable.  I get the same impression when trying to find words I want in a Chinese-English dictionary:  It's not clear which one I want, and when my Chinese friends see my choice, they just tell me "oh, we don't use that word".  Pah.  And don't get me started about how inflexible the searching is.  I should have the ability to click on a character, break it down into components, then see other words with the same components.  That will help me sort out whether I want 青、晴、清、情,or 请!

When I'm online, I'm constantly using the dictionary at MDBG. It's aimed at Chinese for westerners, and the English descriptions are carefully worded so that in general, it's possible to tell which of the five ways of saying something you actually want. And seeing which HSK level a word is rated at also gives an idea of how common it is.

  http://www.mdbg.net/chindict/
 http://en.wikipedia.org/wiki/HSK_test

This website uses the CC-CEDICT database, which can be downloaded and used for free! Since I like the database so much, I've been dreaming of writing my own Chinese dictionary program which uses that database. And I intend to turn that dream into reality. But in order to do that, I need a platform to run it on.

I have looked around, and I've decided to write it for the Nintendo DS. This is a mature platform, with 4M of RAM, two nice screens, long battery life, a free toolchain, a GUI library, and as much read-only data as you can fit on an SDHC SD card. And cheap too: I picked up a grey market one the other day for A$130.

  http://en.wikipedia.org/wiki/Nintendo_DS_homebrew

As far as a user interface goes, I am thinking of making it work somewhat like this program called Pablo:

  http://ehaton.blogspot.com/2007/02/learning-chinese-pablo-my-personal.html
  http://haton.free.fr/chino/pabloscreenshot.jpg

There are also some free handwriting recognition engines which I plan to try, with a view to giving my dictionary handwriting recognition:

  http://www.tegaki.org/
  http://www.kiang.org/jordan/software/hanzilookup/
  http://hanzirecognizer.sourceforge.net/
  http://zinnia.sourceforge.net/

The DS doesn't come with a UI library, so I would either have to write that myself, or use someone else's.  I am intending to use the "Woopsi" library:

  http://ant.simianzombie.com/?page_id=128

I think my first task will be to port my Chutor program from J2ME to the DS.  As well as being useful in it's own right, it will be a good test of the UI library, and my ability to port Java to C++.

Once that's done, I will move onto doing the dictionary program.  I'm likely to leave the handwriting recognition to last.

Computer assisted Chinese (part II): Touchscreen 1

In learning Chinese, I want computers to assist me in two ways. The first is in learning Chinese characters, and the second is as an in-class dictionary/reference.

The first is just a follow-on step from my flashcards and Chutor phone program. But I need to get smarter about how I learn characters. For that reason, I'm using Skritter, a great web service which uses spaced repetition to teach you characters:

  http://www.skritter.com/

To use Skritter, you have to write Chinese characters in an on-screen scribble area.  You can do this with a mouse, but it's fiddly, and I think it's not very good for your wrist, as you're using wrist muscles to try and get the fine motor control you usually get with your fingers on a pen.

A better solution is to use some kind of pen input device.  This is a much more natural way of doing things.  Commercial pen input devices are far too expensive in Australia (at least A$60 for an entry level model).  So I am thinking of using one of these extremely cheap touchscreens, which are intended as replacements for the Nintendo DS:

  http://www.dealextreme.com/details.dx/sku.3245

Eventually I want to read this touchscreen with a small microprocessor, and present this to the computer as a USB touchscreen.  For the moment, I'm going to take a number of half-way steps.

The first half-way step is to start with the larger, commercial touchscreen that used to be inside my EeePC.  The touchscreen size is 15cm by 9cm, which is a lot bigger than I need, but it already has a working controller board.

Once I have that working, I plan to move to one of the smaller replacement touchscreens, and use an Arduino to make it appear as a USB device.

  http://www.arduino.cc/

I think if I can get all this working, I can replace the Arduino with a smaller dedicated micro, put it in a nice, flat case, and make a pen input device for about A$20.

Second project in next post.

Computer assisted Chinese (part I)

I am learning Chinese.  Since I hate doing things by hand that can be automated (and because it's much more fun to hack with the the computer than do work), I like to use the computer to help me whenever I can.

For me, the hardest thing about Chinese is learning the characters.  Unless you're actively learning and reviewing them every day, you're forgetting.  And the techniques I've seen my classmates use (such as just writing them a few times) doesn't seem to help me.

When I was learning Chinese in 2005, I typed the word list from each chapter of the textbook into my computer.  From this, I could print the lists on labels, and make flash cards.  Each flash card had the Chinese character and the pinyin (pronounciation) on one side, and the English meaning on the other.  It took a lot of time to enter the characters, and a lot of time to make the flash cards, but I found it a very effective way of learning.  I'd stick a bundle about 6cm x 4cm and 3cm high into my pocket, and be all set to learn when I had some free time, such as waiting for a train.

I'd start with all the cards in my hand, and look at each one in turn.  If I knew the card (for example, I could write the character from memory, given the meaning and the pronunciation), I'd remove that card from my hand, and put it on my discard pile.  Otherwise I'd move that card to the back of the pile I was holding.  The cards I knew well would quickly leave my hand, and my time would be spent working on the ones I didn't know.  For reasons I don't fully understand, some characters are easy for me to remember, and others give me such trouble.  It was years before I could remember to write such every-day things as 喜欢 and 意思!  When I'm learning, I might need to see some cards ten times before it will finally sink in.

What I had implemented was a real-world form of a "spaced repetition" learning system, and it worked really well for me:

  http://en.wikipedia.org/wiki/Spaced_repetition

The drawback of this approach, as well as the preparation time, is that I ended up with a bag of some 22 bundles, which is a pile around 60cm high!  That was quite unwieldy to carry around, so I'd have to put some thought into the bundles I wanted to carry, and leave the rest at home.

After a while I got tired of the physical nature of the cards, so I decided to do it with a computer program.  But lugging around a laptop is not really an option!  What could I run the software on?

I eventually decided to write the app as a J2ME Java app, as J2ME programs will run on most phones.  Over the course of 2007, I worked on the program when I had some spare time (mostly on the train).  I finally released the program in 2007 as "Chutor", which is a portmanteau of "Chinese Tutor".

  http://sf.net/projects/chutor
 
It shipped with the word lists from the New Practical Chinese Reader volumes I, II and III, because that was the textbook I was using at the time, but it can be tailored to take any vocab.  When I was in China in 2008, I reworked it to use the vocab of the textbooks were were using there.

Although the program has a number of non-critical bugs, I find it very convenient for reviewing characters when I have a few spare minutes:  waiting for a train, or for a few minutes before going to sleep (and yes, learning characters is very effective at inducing sleep).

The missing feature I'd like most is spaced repetition (although I really want and need it, and adding it wouldn't be hard).  At the moment, if you get a character right, that character gets dropped until you go and select a new set of chapters.  But even so, the program is useful enough.

Give Chutor a try on your phone.  Does it work for you?  Does it help?

Monday, February 8, 2010

First post!

Well, hardly surprising as it's my blog :-)

I've created this blog to put tech stuff in that wouldn't appeal to the sort of people who read my other blog. Expect stuff about electronics, creative spaces, Linux and coding.